...
The module is packaged as an omod file, that can be added to an OpenMRS instance the way a module would normally be added (either via the admin interface or by dropping the omod into the appropriate folder).
New installation
When it is first installed JSSLab admin module will update the OpenMRS database, creating new tables that are specific to the module. In addition to that, default metadata, that is required for the module's operation, is added to existing OpenMRS tables.
...
The JSSLab admin module extends the OpenMRS administration by a new section called JSSLab. In this section there are 5 (+1) pages available to work with, that will be described throughout this section.
Settings
TBD
Catalog
TBD
Templates
Not yet implemented
Instruments and Supplies
TBD
Reports
Not available in current version of the module
Initial Setup
...
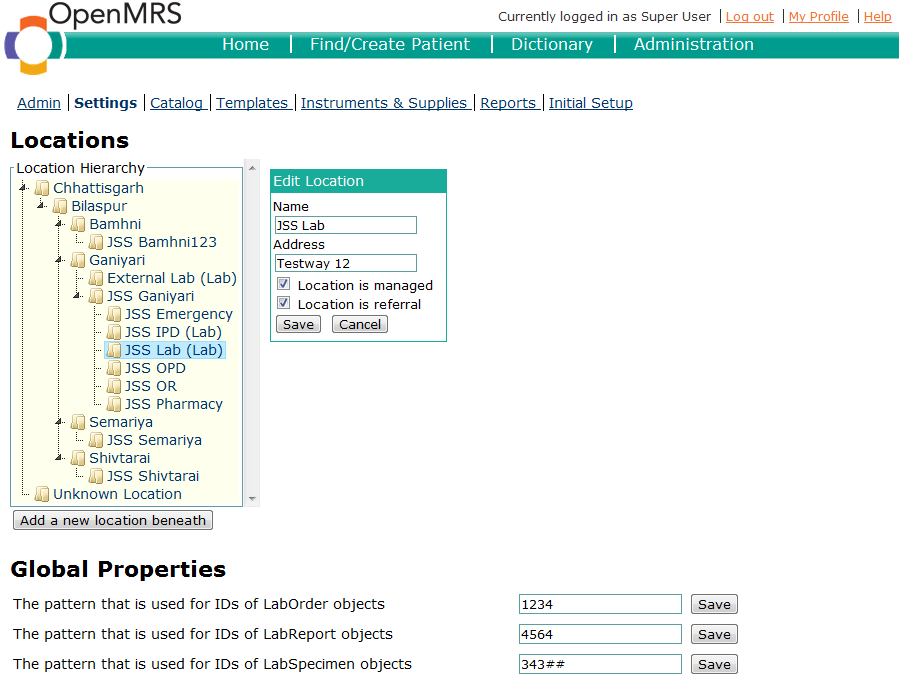
At the top of the Settings page the user can choose to edit the Locations that exist in the system. They can add new Locations, change their names, address and mark them as referral or managed Laboraties.
If a Location is marked as referral, it means, that it has a Laboratory and Lab Orders can be sent to it. If it is marked as managed it means that it is the preferred (and usually local) Laboratory. There can be only one managed Location at any one time.
Additionally, the settings page offers configuration capabilities for all JSSLab specific Global Properties. Their values can either be plain Strings or references to an object of a certain class. In the latter case available options are offered as an autocompletion field below the textbox being edited.
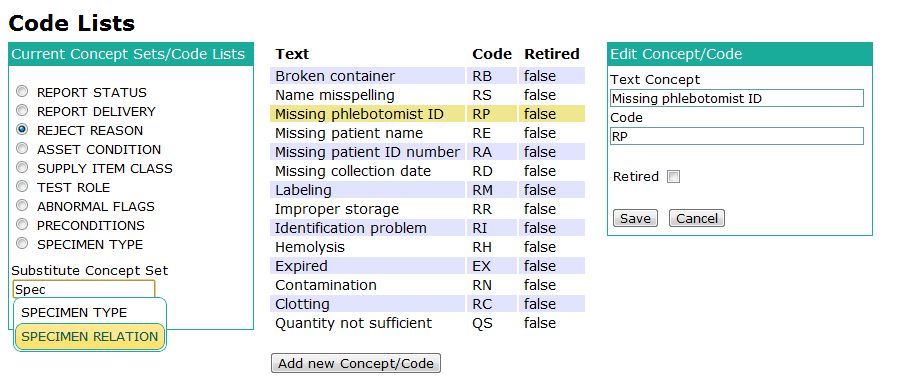
Finally, the Settings page can be used to manage so called Code Lists. These are lists of Concepts that resemble certain categories. For example the possible reasons to reject a test are grouped in the code list "REJECT REASON".
The screenshots below illustrate what the page looks like.
Catalog
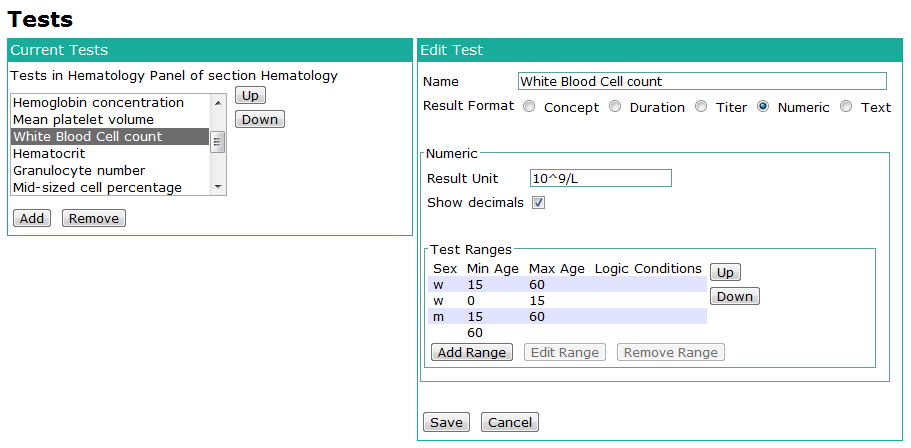
The Catalog page has a core role in managing the JSSLab metadata. On it the user can create and edit Investigations and the associated Tests. Each lab that was previously marked as referral or managed on the Settings page can now be accessed from the Laboratory-labeled dropdown field that can be seen in the screenshot below.
The list of Investigations shown in the table below will adjust according to the currently selected location. The right side allows the user to change all details of the Investigation, except for the Tests performed for it.

Due to the complexity of the Test metadata a separate pair of panels was created for the management of it. The screenshot below shows those panels. The tests being displayed in the list on the left again depend on the currently selected investigation in the top left panel.
Templates
The Templates page has not yet been implemented. It will allow the user to create hiearchies of Specimen Templates that will describe in what way and order Specimens will be handle to complete a particular investigation.
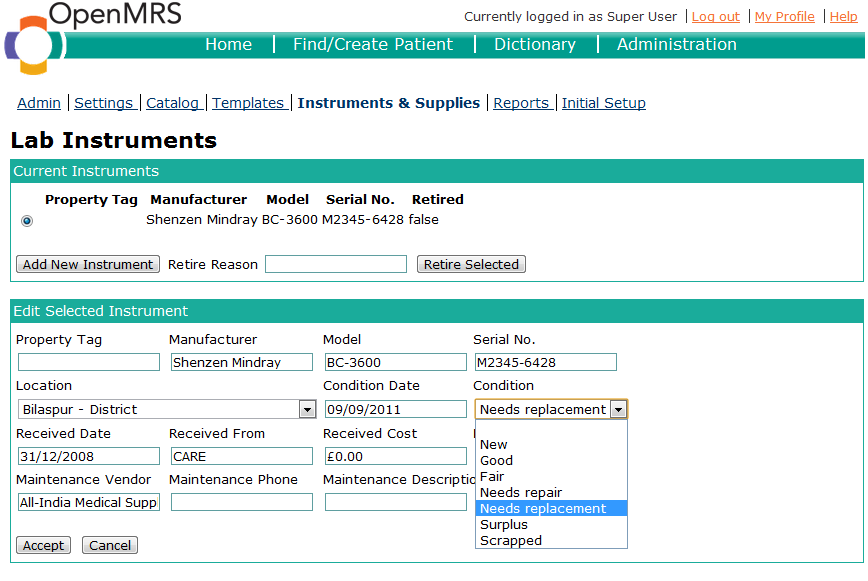
Instruments and Supplies
This page permits the user to edit and create lab instruments and supply items to resemble what is available and what parameters like condition and date of purchase are. The screenshot below shows and instrument being edited.
Reports
The Reports page has not yet been implemented, but also was not in the scope of the GSoC project. It will allow the management of metadata
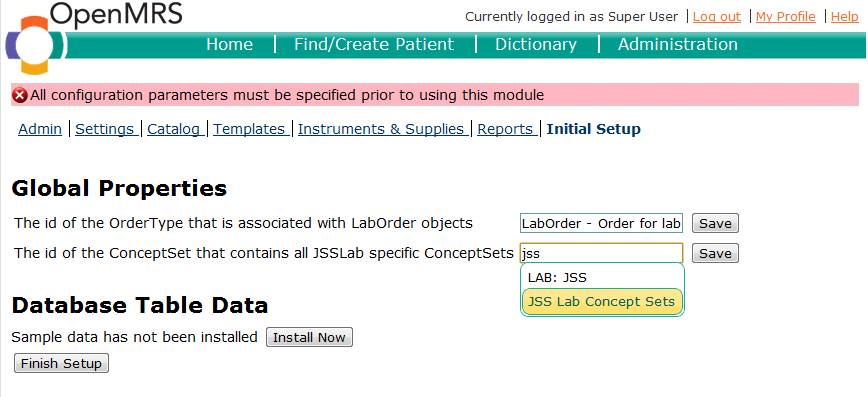
Initial Setup
This page is loaded if the user tries to access any of the module's pages before the initial setup has been completed. This will happen usually after the module is first installed. It may also happen after a module update, if there are changes that require user input to complete.
The Initial Setup page also allows the user to install sample data, which is primarily relevant to showcase the module's functionality.
Design
This chapter contains all relevant information on the design of the JSSLab admin module. There are three domains to be concerned here.
...
- the default liquibase.xml will be automatically run by OpenMRS during the module installation and create all table shells for JSSLab
- liquibase-sample.xml and liquibase-basedata.xml will be called on demand if the user chooses to have the data installed.
Admin pages
Mock-ups of the admin pages are available here
...
| Jira Issues | ||
|---|---|---|
|